Friday, August 19, 2011

Testing the Vacuum Form Master

Progress!

I was able to finally cast a usable master for vacuum forming... with mixed results.
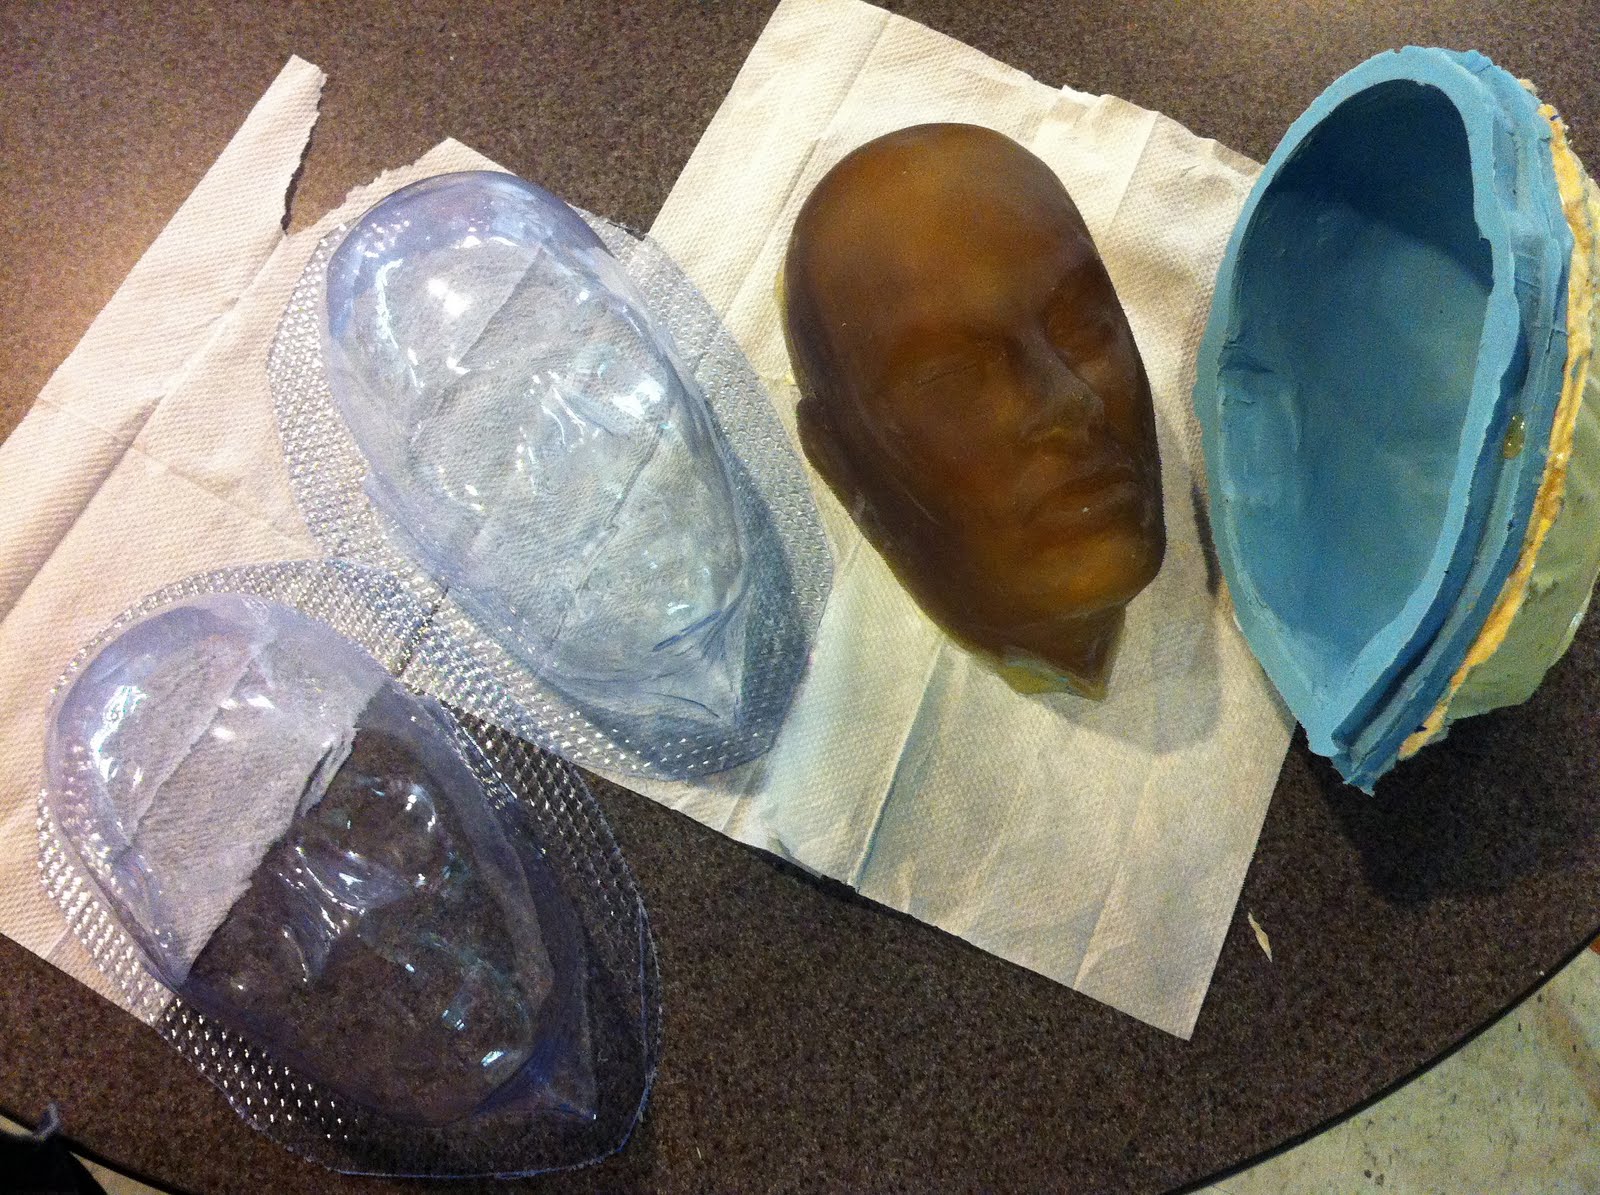


Here we can see the vacuum for master, it's mold, and two "pulls" in clear plastic. Jon (the Techshop Vacuum Forming Instructor) was kind enough to allow me to horn in on his class and make these two tests during class! Talk about convenient.

Obviously, these test runs reveal more work to be done... the master, or Plug as it is referred to in the vacuum forming circles, is poorly vented (meaning not at all) thus none of the detail I worked so hard to achieve is coming through.


Still, I find these a good start. The look human and are very tough. this grade of common PETG plastic will hold up well for sculpting over.

All I need to do is cast a NEW version of the Vacuum Form Master with tiny holes near the eye sockets and maybe under the nose.

I may use a rubber/ceramic hybrid master, as an outer layer of rubber would be nice for removal after vacuum forming... one can take advantage of under cuts, vertical walls and other difficult vacuum forming issues using this concept.


Sunday, August 7, 2011

The Mold: Rubber Shell

Here, I am at TechShop --it a bench of course-- setting up the clay retaining walls for my mold... I used modeling clay from Chavant Inc., it has a good amount of "stick" yet remains solid for forming ( I used the sulfer free blend, of course). I love this clay a lot, gotta get more.


After the first layer, I add more clay... this time, I'll try a shallow vertical wall to better retain the bottom edge and maybe form a lip to help hold the hard outer shell I'll later add.


Next, with the wall in place, I mix up some fast curing Smooth-On™ Oomoo 25 (75 minutes!) as there is a lot of it around TechShop for my class.

I use fairly old, on the shelf (used, open bottle--etc) Smooth-On™ Oomoo 25 as it tends to go off faster (thus making it a little unpredictable for class), this will allow me to form a nice "globby" coat for the first layer detail coat, yet still be pourable-ish to flow where needed.


 Sometime later (about two hours), I can do the next layer of Smooth-On™ Oomoo 25 after some . This layer was a bit "newer" batch, so I just waited for it to start gelling before I spread it out over the part...


... this layer was "hand smoothed" as it cured, so more of the material ended up on top of the job. This a tedious way of doing things, but I had none of my trusty Cab-o-sil on hand for thickening the layer. Cab-o-sil is great for adding, by degree, a lightweight thickener.

Curing now, I'll post more as I do more :)


Next: The Hard Outer Shell!


© Tom Twohy 2011

Friday, August 5, 2011

Details, details...

Here you can see my "final" sculpt for the Vacuum-form "Buck" (or Master) to be used to see if I can make the idea work... the vacuum formed pieces will form the basis for the sculpting blanks need for my new "Monster Mask Workshop".

Sculpting for success!


Heres a nice (though small) head I've sculpted for a 'Monster Mask Workshop' we are planning for TechShop. Note how the clay is smooth and relatively free of details.

New Start!

A while ago, I started this page to blog about my time at Techshop... and now, I'm getting back into "the rubber life" and so... I'm BACK!

Monday, September 13, 2010

Mold Masters and Good Modeling Habits

When beginning a mold, one must begin with a well made model or original part ... the Master. The mold-work will depend on the inherent quality of your model work. The mold's Master, wether made by you or your client, should the best possible looking, most final iteration of your design process.

How do we know when we have a usable model for a rubber tool mold? Look for these important details:


  • Stable: While silicone will harden against most surfaces... such as ice and  ice (and even ice has curing length issues)... some surfaces are simply not going to hold their form long enough to get a good impression. 
  • Non-Porous: While it is temping to just carve rough styrofoam, floral foam, lava stone or other porous surface... toss on some silicone and save on worktime. Unless your foam is very dense... you could have problems de-molding. The same is true for bark and other kinds if wood or cement surfaces. 
  • Smooth: This is key. A rough surface will cause tiny bubbles to cling to the surface and ruin the mold. Small patterns and textured surfaces will require a detail coat of silicone pre mixed and applied before any large pouring of silicone.

There will be times when you will find that these tips are perhaps over stated, but each is worthy of caution.

Wednesday, September 8, 2010

A Blog about silicone rubber molds!

Welcome to my blog regarding silicone rubber and the many ways is can be used in both commercial and recreational making.

Through TechShop , a bay area membership based place for technically savvy creation, I am beginning to offer a series of small classes on silicone molds. A beginners class has been offered first... just to get everyone thinking about using Techshop as not only a place for creating your idea... but as a place to produce molded plastic parts with proper guidance.